This is really fantastic to tell you, today I did a small hack on Hosting Custom Domain with Blogger. You may be wondering why this topic name is given as Advanced Guide, because everyone knows if you have a control panel then you can easily mapped your domain to your blogger blog, its a common at all. Here is the tutorial for doing this Google Help Forum.
But when you just purchased a domain from some registrar they don not give you a free control panel by default, you have to buy a hosting plan then you will get control panel access. But in this tutorial I am going to mapped my custom domain to newly created blog in blogger using some really fantastic web application that you can get it for free.
This Gitspot.com is created using the same techniques. Here is the procedure for doing this
Steps are the Following....
0. First of all i am assuming that you have a domain http://www.gitspot.com/ purchase on xyz.com
1. Create a Blog on Blogger e.g., gitspot.blogspot.com
2. Create an Account on http://dns.he.net/
3. Go to your domain registrar xyz.com and Click on My Domains and then click on your domain name http://www.gitspot.com/ i.e., www.your-domain.com then in the below you will see four text boxes
6. Then a page will pop up Now just put gitspot.com i.e your-domain-name.com without www and click on Add Domain!
7. You are 75% done Now.
8. Now on the Home page of https://dns.he.net you will see gitspot.com i.e., your-domain.com Click on Edit Zone (Small edit icon)
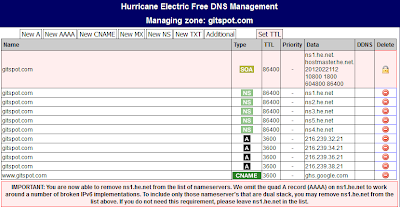
9. Then you will see an Advanced DNS management tool
10. Click on New A on the top and one page will pop up and in there

But when you just purchased a domain from some registrar they don not give you a free control panel by default, you have to buy a hosting plan then you will get control panel access. But in this tutorial I am going to mapped my custom domain to newly created blog in blogger using some really fantastic web application that you can get it for free.
This Gitspot.com is created using the same techniques. Here is the procedure for doing this
Steps are the Following....
0. First of all i am assuming that you have a domain http://www.gitspot.com/ purchase on xyz.com
1. Create a Blog on Blogger e.g., gitspot.blogspot.com
2. Create an Account on http://dns.he.net/
3. Go to your domain registrar xyz.com and Click on My Domains and then click on your domain name http://www.gitspot.com/ i.e., www.your-domain.com then in the below you will see four text boxes
- Name Server 1: ns1.xyz.com
- Name Server 2: ns2.xyz.com
- Name Server 3:
- Name Server 4:
- Name Server 1: ns2.he.net
- Name Server 2: ns3.he.net
- Name Server 3: ns4.he.net
- Name Server 4: ns5.he.net
6. Then a page will pop up Now just put gitspot.com i.e your-domain-name.com without www and click on Add Domain!
7. You are 75% done Now.
8. Now on the Home page of https://dns.he.net you will see gitspot.com i.e., your-domain.com Click on Edit Zone (Small edit icon)
9. Then you will see an Advanced DNS management tool
10. Click on New A on the top and one page will pop up and in there
- Name: put gitspot.com i.e., your-domain.com without www and in IP4 Address put 216.239.32.21 TTL 1 Hour 3600
- Continue the above for these addresses 216.239.34.21 216.239.36.21 216.239.38.21
- Now Click on New CNAME and put www.gitspot.com i.e., www.your-domain.com in the Name and ghs.google.com in Hostname. TTL 1 Hour i.e 3600 is sufficient. :)

11. Now go to your Blogger Setting Click on Custom Domain, and then Advanced Settings add http://www.gitspot.com/ i.e., www.your-domain.com and Save it. After this it should look like this in Blogger settings
12. You are Done! Enjoy
12. You are Done! Enjoy


Comments
Post a Comment